11 Ekim 2019 Cuma

Download iOS 13.2 and iPadOS 13.2 Beta 2

Install iOS 13 iPhone
Apple today released the second developer beta of iOS 13. 2 and iPadOS 13.2 for all compatible iPhones and iPads. The first beta of iOS 13.2 had introduced Deep Fusion processing for the iPhone 11 and iPhone 11 Pro.
Deep Fusion uses Neural Engine on the A13 Bionic chip of the iPhone 11 and iPhone 11 Pro to capture more details.
The second beta of iOS 13.2 and iPadOS 13.2 is likely going to be all about bug fixes and minor enhancements, if any.
Apple will presumably release iOS 13.2 and iPadOS 13.2 to the public later this month likely after its October event.Also Read:photo to pc
Download iOS 13.2 and iPadOS 13.2 Beta 2
If your iPhone is already on the iOS 13 beta channel, you can head over to Settings -> General -> Software Update to grab the iOS 13.2 beta 2 update. The same also applies for the iPadOS 13.2 beta 2 update.
In case your iPhone or iPad is running the stable version of iOS 13.1 or iPadOS 13.1, you will have to first install the developer beta profile on your device.
Alongside the second beta of iOS 13.2 and iPadOS 13.2, Apple has also released the second developer beta of watchOS 6.1. A public beta release of all three OSes should happen later this week.
Also Read:AVI movie sites
Noticed any other changes in iOS 13.2 or iPadOS 13.2? Drop a comment and share them with us!

19 Eylül 2019 Perşembe

How to Remove Autofill on Mac with One Click


What Does Autofill Mean

If you’ve never used autofill before let’s take a minute to go over just what it means. When you fill in a form it takes a lot of time, right? You have to fill in things like your name, address, phone number, email address and possibly more. Every time you want to purchase something from a company you have to fill in that information and that can get a little annoying, right? But you don’t have to with a Mac.

Your Mac actually has the ability to save the information that you put in. That means you only have to put the information in a single time. Then, the next time that you go to put your information into a form, the computer itself will actually fill in that information for you. It saves you a whole lot of time and effort, but there are some downsides to this as well. Let’s discover more in next part.

Conclusion

Autofill on Mac automatically fill out these information: online forms including address, credit card, password, etc, and log-in information including email address, password.
Why You Should Delete Autofill on Mac

Now, when you’ve heard about how much more convenient and time-saving it can be to use autofill why would you want to delete it? Well, the number one reason that you should learn how to remove autofill on Mac as quickly as possible is that it’s actually dangerous. When you have autofill you don’t have to fill in any information anymore. Your computer recognizes what your address is, what your date of birth is, even what your credit card number is. That means anyone with access to your computer has access to that information.

Now, it’s very difficult for someone to actually copy the information from your autofill and use it elsewhere. But it’s extremely easy for them to access your computer and use it to do whatever they want. They can use your computer to make a purchase (or several purchase). They can use it to apply for credit cards or loans. They can do anything that they want with that information and you’ll then have to deal with the ramifications that come around as a result. And you may not even realize what they’ve done for months or longer. Or you may not recognize the full extent of the damage until much later.

If that’s what you’re risking, however, what should you do to make sure you don’t have to worry? You should be removing your information from autofill, and that’s going to be a lot easier than you thought.
How Do I Delete Autofill on Mac in Every Browser Manually

Let’s take a look at the three most popular browsers and how to remove autofill on Mac manually. We’ll talk you through the process so if this is what you want to do, you can absolutely jump in and take care of your information.
Remove AutoFill in Safari

Safari is one of relatively popular browsers and we’ll take a look at the process here. It’s actually a little more in depth to get it done. A distant 10.54% of people choose Safari as their favorite browser. That puts this browser as the third out of the top three web browsers, only slightly ahead of Internet Explorer, which is the fourth most popular.


Open the Safari browser.


Select “Preferences” then “Autofill”.


Select “User Names and Passwords” and select ‘Edit’ then “Remove”.


Select “Credit Cards” and select “Edit” then “Remove”.


Select “Other Forms” and select “Edit” then “Remove”.


Tip: To turn off autofill in Safari on Mac, just turn to "Disable Autofill in Safari" part.
Remove AutoFill in Chrome

Chromeis one of the most popular browsers around and as a result you may need to know how to remove your autofill information from Chrome. Below are the simple steps to do that.


Open the Chrome browser.


Select “History” then “Full History”.


Select “Clear Browsing Data”.


Select “Passwords” and “Autofill Form Data”.


Select “Clear Browsing Data” again to confirm.


Tip: To turn off autofill in Chrome on Mac, just turn to "Disable Autofill in Chrome" part.
Remove AutoFill in Firefox

This is another of the most popular browsers out there thought and the process to remove autofill is actually relatively simple.


Open the Firefox browser.


Click “History” > “Show All History”.


Select “Everything” in the “Time Range to Clear” menu.


Choose “Form & Search History”.


Click “Clear Now”.


Tip: To turn off autofill in Firefox on Mac, just turn to "Disable Autofill in Firefox" part.

Now, if you’re looking at how to remove autofill on Mac this way you’re going to spend a lot of time at it. Going through each browser, one at a time, and deleting all of your information is going to require a little bit of a learning curve too. After all, you have a different process for each of the most popular browsers. But what if you could do it more easily? What if there was a type of Mac cleaning software that could scrub your information from every browser with just the click of a button? You’re in luck, because it absolutely exists. You just need to take a look at the app we are going to talk about next.

Also Read:deepnude alternatives

Also Read:4K Video Downloader


28 Şubat 2019 Perşembe

What to Do When Instagram Videos Are not Playing? 2019 Guide

What to Do When Instagram Videos Are not Playing? 2019 Guide

Instagram provides a great way for users to share photos and videos with friends. But lately there have been a number of users who have reported that videos on Instagram will not play. Sometimes the issue can start immediately after an iOS update, for example iOS 12. Regardless of how it started or why you think Instagram videos won’t play, the following article will explain why the videos are not playing and a number of solutions to fix the problem.
Why are Instagram Videos Not Playing/Loading?

The reasons why your Instagram videos won't play can be as varied as the various uses for your device. They can be software related like a problem with the Instagram app itself or hardware related, like when you drop your device. The most common causes of this problem however include the following:


It is possible that the Wi-Fi or cellular connection you are using is not strong enough to stream Instagram videos.


The data on your Instagram app may also be corrupted or you may be using an outdated version of the app.


It is also quite likely that the video you are trying to play has been deleted by the user who posted it.


Activating power saver mode on your device can also prevent you from streaming the videos.
How to Fix Instagram Videos Not Playing/Loading?

The following are some of the solutions you can try to fix the Instagram not playing videos issue and get them playing again. Try each one in succession to find the one that works.
1. Check Your Internet Connection

If you are using a cellular connection switch to Wi-Fi. If Wi-Fi is not working, check your router. The best way to check whether the device is connected to the internet is to open a webpage in Safari. If the webpage loads correctly, the internet is not the problem. If it doesn’t, you may want to reboot the router or check the router cables. You can also check if other devices are able to access the internet with the same Wi-Fi connection.
2. Update or Reinstall the Instagram App

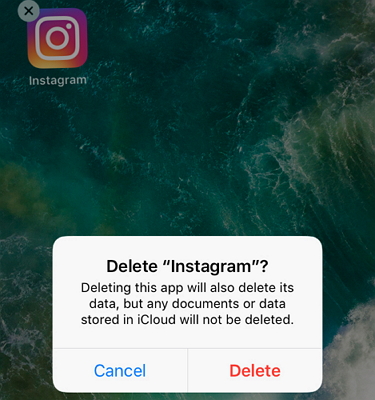
Once you’ve determined that the internet connection is not the problem, you may want to turn your attention to the Instagram app. Tap and hold on the Instagram app until it wiggles a bit and then tap on the “X” icon that appears to uninstall the app. Now go to the App store and re-download the app.


3. Disable Autoplay on Instagram

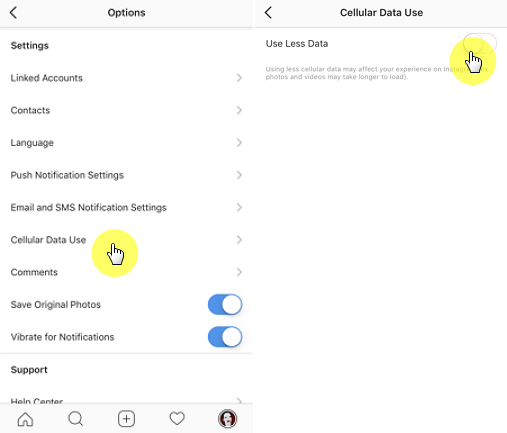
The Autoplay function can also interfere with how videos load and play in Instagram. Some people have found that when disabling this feature, the videos played normally. Unfortunately when you are using Wi-Fi, the “Disable Auto Play” function is no longer available. But there is a way to disable Autoplay if you are using cellular data. Here’s how:

Step 1: Open Instagram and then tap “Options.”

Step 2: Choose “Cellular Data Use”.

Step 3: Tap on “Use less Data.”


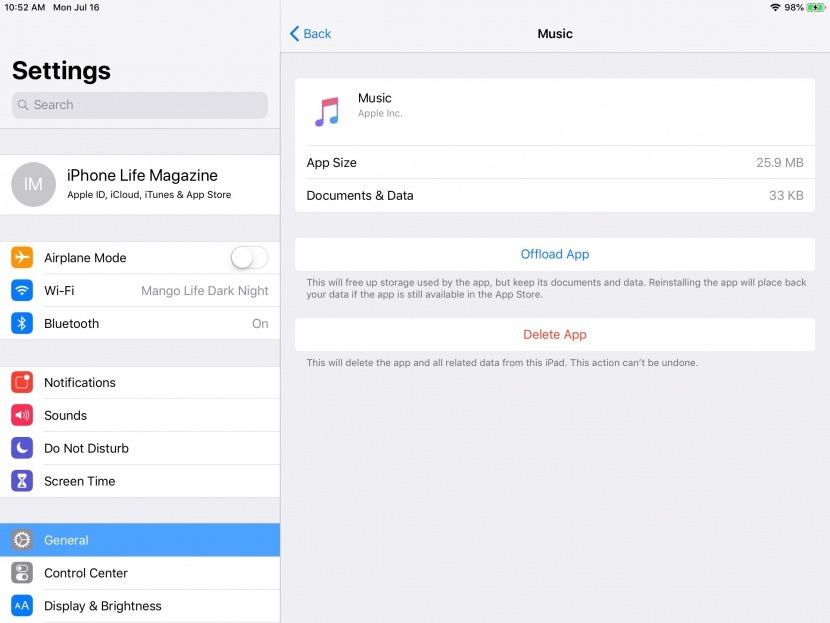
4. Clear Instagram Cache

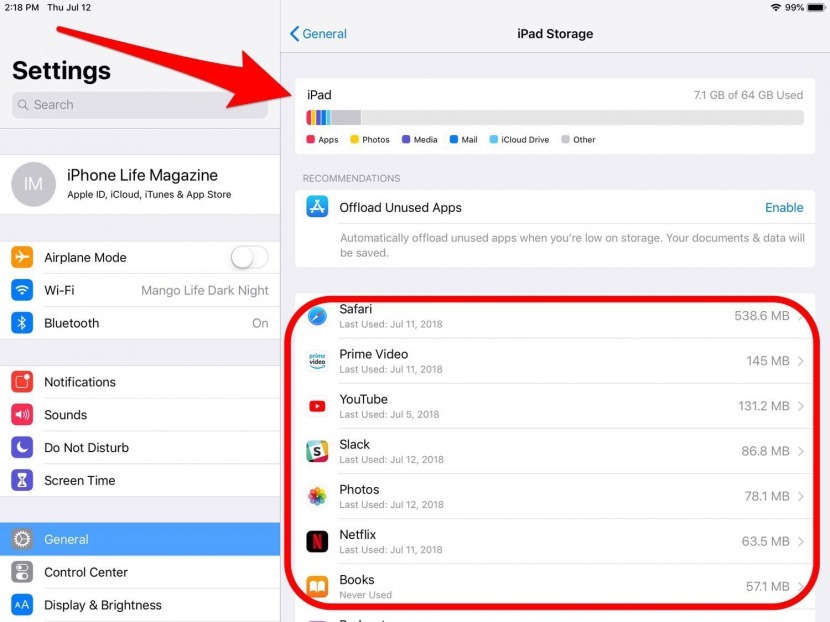
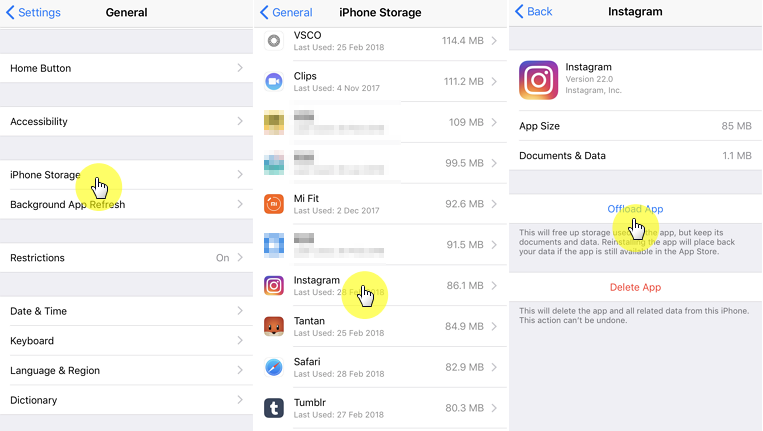
Like we mentioned before, corrupted Instagram data could be causing the problem. In this case, the only way to fix it is to clear Instagram cache. On the iPhone with iOS 11 or iOS 12, the best way to clear cache on the app is to offload the app and then download it again. In this way, you will free up the storage used by the app but will keep its documents and data. Here is how to do this:

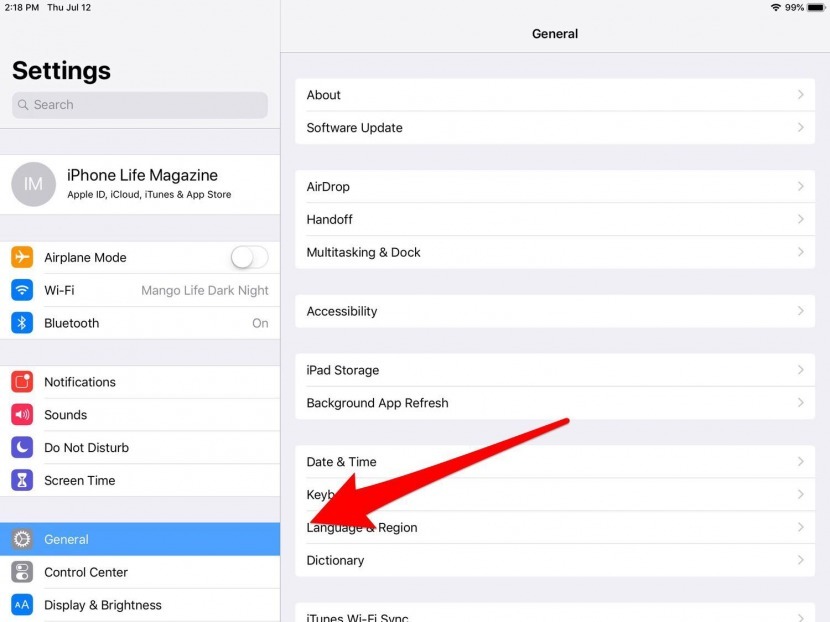
Go to Settings > General > iPhone Storage, locate the Instagram app, tap on it, and then tap on Offload App on the next page.


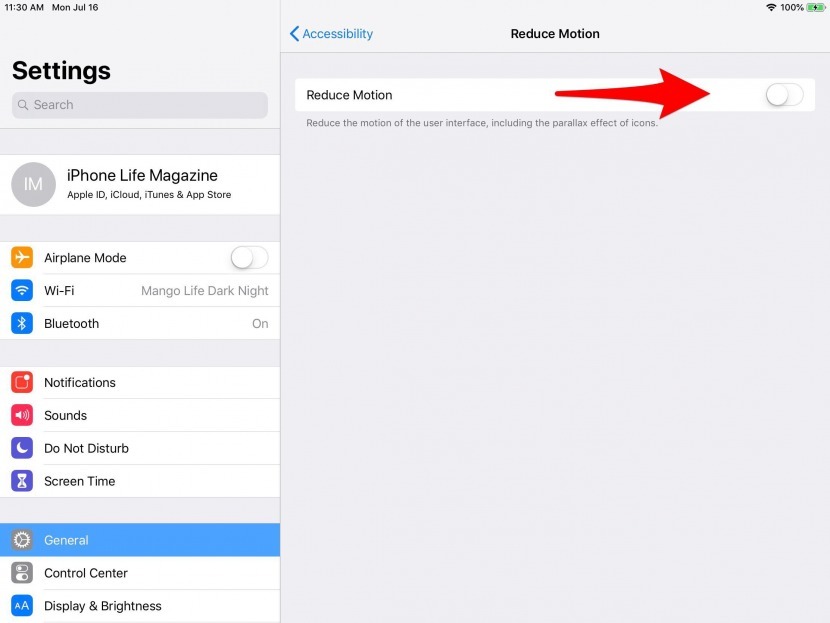
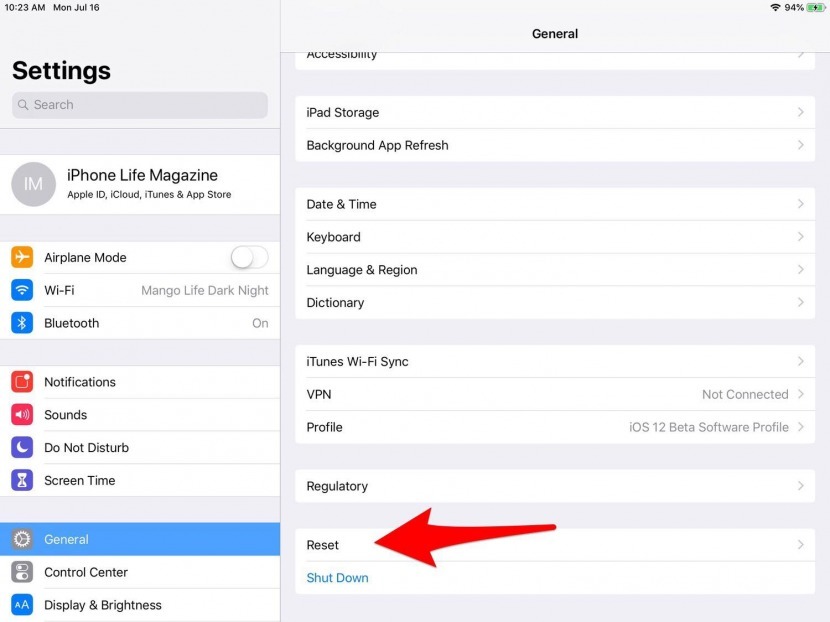
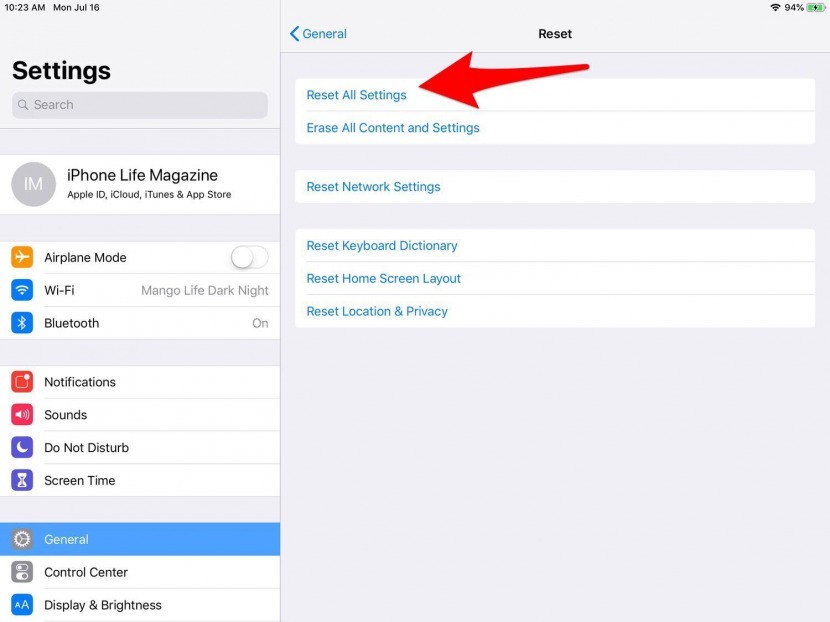
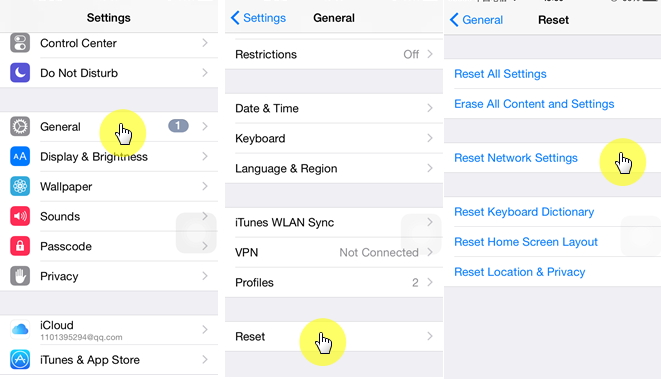
5. Reset Network Settings

Since the problem may very well be caused by a network connectivity problem, you may want to reset your network settings to see if that fixes the device. To do that go to Settings > General > Reset > Reset Network Settings and then enter your passcode.


6. Fix iOS with iMyFone iOS System Recovery

If none of the above solutions work to fix the problem Instagram videos not playing, we recommend you to try fixing the iOS system using a third-party tool like iMyFone iOS System Recovery. This program is designed to fix any issue you may be having with your iOS device (iOS 12 included) and get it working normally again.Sponsor ads:

Gihosoft Free iPhone Data Recovery:https://www.gihosoft.com/iphone-data-recovery-free.html

Gihosoft iPhone Data Recovery Free

Free iPhone Data Recovery Software for Windows/Mac

Recover up to 12+ types of files, including contacts, SMS, photos, WhatsApp, Viber, notes, etc.

Restore lost data from iOS devices directly or from iTunes and iCloud backup

Recover iPhone data lost due to iOS upgrade/jailbreak, accidental deletion, device lost or broken

Support all the latest iPhone, iPad and iPod Touch

Both Free and Pro version.

If you lost data after you updated to a new iPhone, you can always use Gihosoft iPhone Data Recovery to get the data back from the old iPhone or backup.You may also like: iphonerecovery.com

If you use android phones, please choose Gihosoft Android Data Recovery.

With Gihosoft Android Data Recovery, no longer afraid of data loss!

Must read:Youtube video downloader for pc

Gihosoft RePicvid Free Photo Recovery Software provides a free photo recovery software for windows to help users recover the deleted or lost photo for free.

Jihosoft Android Data Recovery: the best Android Data Recovery software for Windows and Mac to recover deleted contacts, messages, photos, videos, WhatsApp and etc from Android devices.Tips:How to transfer messages from iPhone to iPhone

jihosoft Free iPhone Data Recovery

20 Şubat 2019 Çarşamba

Transfer Music from Mac to iPhone Using Cloud Services 2019


2019 Transfer Music from Mac to iPhone Using Cloud Services

Perfect for: iPhone users who have much iOS space and have stable Wi-Fi connection.

Cloud services allow you to store music on servers using the Internet, so you can technically use them to transfer music from Mac to iPhone as well. Here are some services you could try:


Google Play Music

Google Play Music allows you to buy music and store it on the cloud, so this means that you can share it among many devices. However, one major limitation is that you will need an Internet connection and download another app on iPhone to access your songs. Also, you usually have to buy the music.


Airmore

Airmore is a convenient app that lets you connect all of your devices together and transfer files between them wirelessly. Like any other cloud app, though, one huge limitation is that you need to have an Internet connection to use it - it is wireless, after all. Also, it requires a two-step process, since you need to upload the files to the cloud from your Mac, and then download them off the cloud to your iPhone.In contrast, with TunesMate, you can just directly transfer music from your Mac to your iPhone and you don’t need an Internet connection.


03 Transfer Music from Mac to iPhone with iTunes

Perfect for: iPhone users who do not fear to lose songs while transferring.

Of course, you can always just go with iTunes, since it’s the default option—even if it’s not the best one. Here is how to do it:


Launch iTunes and connect your iPhone to your computer.


On iTunes, make sure you are in "Music" library. Go to "File > Add File to Library" and locate your Mac music.


Select the songs you want to transfer and hit "Open" to add them to iTunes music library.


Click device icon at the upper right corner on iTunes and go to "Music" from the left sidebar.


Check "Sync Music" and choose to sync entire music library or selected songs. Hit "Sync" button to transfer music from iTunes library to iPhone.


As you might already imagine, there are a few limitations with this.


For one, it will erase the previous music on your iPhone.


It only supports specific formats, like MP3. You need to convert music first.


If your iPhone is synced with another iTunes library, or it is the first time to sync your iPhone music on this Mac, it will erase your iPhone.Sponsor ads:


Gihosoft Free iPhone Data Recovery:https://www.gihosoft.com/iphone-data-recovery-free.html


Gihosoft iPhone Data Recovery Free


Free iPhone Data Recovery Software for Windows/Mac


Recover up to 12+ types of files, including contacts, SMS, photos, WhatsApp, Viber, notes, etc.


Restore lost data from iOS devices directly or from iTunes and iCloud backup


Recover iPhone data lost due to iOS upgrade/jailbreak, accidental deletion, device lost or broken


Support all the latest iPhone, iPad and iPod Touch


Both Free and Pro version.


If you lost data after you updated to a new iPhone, you can always use Gihosoft iPhone Data Recovery to get the data back from the old iPhone or backup.You may also like: iphonerecovery.com


If you use android phones, please choose Gihosoft Android Data Recovery.


With Gihosoft Android Data Recovery, no longer afraid of data loss!


Must read:Youtube video downloader for pc


Gihosoft RePicvid Free Photo Recovery Software provides a free photo recovery software for windows to help users recover the deleted or lost photo for free.


Jihosoft Android Data Recovery: the best Android Data Recovery software for Windows and Mac to recover deleted contacts, messages, photos, videos, WhatsApp and etc from Android devices.Tips:How to transfer messages from iPhone to iPhone
jihosoft Free iPhone Data Recovery


22 Temmuz 2018 Pazar

How to Fix Slow iPad? How to Speed up iPad, Even Older Ones!


ipad speed test
How to Fix Slow iPad? How to Speed up iPad, Even Older Ones!
Image courtesy Ookla/speedtest.net
It's also worthwhile to check on your internet speed; there are lots of different speed tests available online, a favorite of mine is fast.com, which quickly shows you how many Mbps, or megabits per second, you have available for downloads. If you're looking for more information, try Ookla, which lets you know your connection's download and upload speed, as well as Ping (the reaction time of your connection, measured in ms, milliseconds.)
If most of what you use your iPad for consists of downloading activities like streaming movies and videos, you'll probably only need to use fast.com and make sure your internet speed is keeping up with your household's demand. AT&T has a great Download Speed Calculator you can use to see approximately how much download speed all your various devices and activities require.   
If you use your iPad primarily for creating and uploading work such as videos to the internet, or if you frequently make calls, especially high-quality calls using services like Skype, you'll need to make sure your upload speed is up to snuff as well. Here's another great tool that lets you enter all your devices and typical usage, calculates your needed download and upload speed, and refers you to all the area internet service providers that can meet your needs.
If you've restarted your modem and router and made sure they're optimally placed, and have run a speed test that shows your internet service is fast enough to meet the needs of your household, your slow iPad problem is most likely an issue with the device itself. Let's go through the different possible ways things could be going wrong, and how to fix them.

Update to the Latest iOS?

why is my ipad so slow
iOS 11-Compatible iPads
Some folks with older iPads have experienced slowdowns after updating to a new iOS, but is this the fault of the operating system? The answer to this question is... kind of. New operating systems are meant to fix glitches, bugs, and security issues, which can make your iPad faster, but they also introduce features that might strain the processing speed of older iPads. It's also an unavoidable fact that as time marches on, some devices are simply left out of iOS upgrades, as with iOS 11. As you can see from the image above, the original iPad mini, as well as the first through fourth generations of the original iPad, are not compatible with iOS 11. Clearly, then, advice to update your iPad to the latest version of iOS doesn't work for people whose devices have been left behind by Apple's software developers.
ipad running slow
iOS 12 Compatible iPads
At WWDC this year, Apple announced that iOS 12, slated for September release, is specifically designed to speed up even older iPhones and iPads. Unfortunately, as you can see from the image above, any iPad that's incompatible with iOS 11 is also not able to update to iOS 12. What does this mean, then? Well, if your iPad is compatible with iOS 12, you can expect that updating to the new operating system will deliver improved processor speed and a more functional iPad. If you can't upgrade your iPad's operating system in the fall, you can keep using your device with the latest operating system that will accommodate it, and try the steps below to speed up your vintage tablet as much as possible.

Restart Your iPad

If you haven't already done so while checking your internet connection and updating your iOS, the next thing I'd recommend is to restart your iPad. Restarting your iPad won't delete any of your data or settings, all you're doing is turning off your device, then turning it on again to reboot your iPad. Rebooting clears your RAM (random access memory) and stopping all processes that are currently taking place. If you have too many apps running, music playing, and so on, everything can slow to a crawl if there isn't enough RAM to keep up. To restart:
  • Press and hold the Top or Side button at the same time until you see the slider appear.
  • Drag the slider to power off.
  • Wait a minute or two, then press the Top or Side button again until the Apple logo appears; your device will then restart.

Memory vs. Storage: Clearing Out Storage on Your iPad

Read this helpful article on the difference between memory and storage; it explains that apps, videos, documents, photos, and music stored on your iPad take up storage space. While RAM and storage are two different things, iOS acts as a buffer between the two, shutting down background processes that aren't being used so that RAM can be used where it's needed. Something you can do to help iOS have less to manage, and therefore speed up your iPad, is to clear items from your storage that you no longer need. First, let's learn how to check how much storage you have available.

How to Check Your iPad Storage

  • Open the Settings app on your iPad.
why is my ipad so slow
  • Tap General, then tap iPad Storage.Jihosoft iPhone Backup Extractor Extract and recover all types of data from iPhone backup files, such as camera roll photos, videos, SMS, contacts, reminders, WhatsApp, and etc.
  • Gihosoft Free iPhone Data Recovery is a professional iPhone Data Recovery software to get back all your lost text message, photo, video, call history, note, contact and more from iPhone/iPad/iPod Touch.

how to reset ipad
  • Now you can see how much of your iPad's storage is in use, and what it's being used for.
speed up ipad
You'll notice in the image above that there's an option called Offload Unused Apps. This is a great feature that saves documents and data while automatically offloading unused apps if storage is low. Unfortunately, this feature appeared for the first time with iOS 11, so if you have an older iPad that can't upload that operating system, you'll need to delete unused apps instead to save storage.

Delete Unused Apps

If your iPad is running slowly, it's probably a RAM issue rather than a storage issue unless you've nearly maxed out the available gigabytes. If your iPad's storage really is nearing maximum capacity, though, it can help to delete apps that you rarely or never use. To delete an app:
  • Open the Settings app and tap General again, then tap iPad Storage again.
  • Now, tap on an app that you'd like to delete, then tap Delete App when the option appears.
how to speed up ipad

Stop Background App Refresh

While we're speaking of apps, let's talk about another way apps can slow down your iPad. Most of us probably open an app, use it for a bit, open another app, and so on; we may have several apps all open at once at any given time. This isn't a problem, in itself, but if Background App Refresh is on, then your iPad is using RAM to refresh every one of your open apps. Here's how to choose whether you'd like to turn Background App Refresh on or off on an app-by-app basis.
  • Open the Settings app and tap General again, then tap Background App Refresh.
my ipad is slow
  • From here you can choose to toggle off Background App Refresh for all apps, or go down the list of your apps and toggle off and on as you see fit.
how to make ipad faster

Move Photos & Videos to Storage

Photos can eat up a sizable chunk of your iPad's storage capacity; if you haven't already, now's the time to offload those pictures. If you have iOS 8 or later, which is compatible with every iPad except the original, you'll be able to use iCloud to save all your photos, so if anything should ever happen to your iPad, they'll be preserved. The problem with this solution is that if you delete photos from your iPad, they'll also be deleted from iCloud! To save your photos while also freeing up storage space on your iPad, your best bet would be uploading them to an external hard drive or computer not connected to your iCloud account, then deleting them from your iPad. Getting on a regular schedule of deleting photos from your iPad will help keep your device running more quickly, as well as making the task less daunting.

Move Downloaded Music Storage

Another storage hog that you may want to consider offloading to your external hard drive is any music from iTunes you've downloaded to your iPad. To check how much storage space is being used by your Music app:
  • Open the Settings app.
  • Tap on General.
  • Tap on iPad Storage.
  • Scroll down and tap on Music.
how to clear ipad
You'll see how much storage is being used in the Documents & Data section, in my case it's only 33 KB.

Clear Safari's Cache/Delete Cookies and Web History

Safari tracks and stores a lot of information about your internet usage including recent searches, a history of web pages you've visited, a list of anything you've downloaded, requests from web pages, and much more. While this cache of data can prove convenient and improve load times, it can also eat up storage space. To clear your browser cache, including website data and cookies:
  • Open the Settings app.
why is my ipad so slow
  • Tap on Safari.
ipad 2 slow
  • Now tap on Clear History and Website Data.
speed up ipad

Change Your Graphics Settings

Let's get back to RAM for a minute; something you might not realize your iPad is using working memory for are graphics settings. These settings can be changed to save processing power and speed up your iPad; to accomplish this:
  • Open the Settings app.
  • Tap on General.
  • Tap on Accessibility.
why is my ipad so slow
  • Tap on Reduce Transparency and toggle it on.
how to make ipad faster
  • Tap on Reduce Motion and toggle it on.
ipad slow

Turn Off Siri & Search

Something else you can try to free up some processing power is to turn off Siri & Search. Changing this setting will turn off Spotlight and Siri Search, which may prove to be inconvenient. The benefit, though, is that turning these features off will save the processing power it takes to index every item on your iPad. To turn off this feature:
  • Open the Settings app.
  • Tap on Siri & Search
Here's where this gets a bit time consuming, but then again, having the ability to decide which of your apps you'd like Siri &Search turned on or off for will let you leave your most essential searches on while turning off those you really don't need indexed.
  • If you want to disable suggestions in Search, Look Up and on Lock Screen, toggle all three of these off.
  • Next, you can tap on any app to toggle off Search, Suggestions & Shortcuts, as well as Allow on Lock Screen.
ipad slow

Last Step: Factory Reset your iPad

If none of the previous steps have helped your iPad to speed up, your last-ditch attempt should be a factory reset. Factory resetting your iPad will wipe all your settings while preserving the data and apps you've chosen to keep on your device. Once this is accomplished, you'll need to restore all your Settings to the way you prefer them, which may take a bit of time! To restore your iPad to factory settings:
  • Open the Settings app.
  • Tap on General.
  • Tap on Reset.
ipad mini slow
  • Tap on Reset All Settings.
reset ipad 2

Trade in/Replace Your iPad

If factory resetting your iPad still hasn't sped it up, the time has come to consider replacing your iPad. Review this articlefor all the steps you'll need to take to erase your personal information from your iPad before you sell or recycle it, as well as how to restore your data to your new iPad once you've purchased it.  Keep in mind that Apple has released new versions of the iPad every September for the past few years; you may want to wait until the new iPads are announced before deciding which version you'd like to purchase!

How to type the Apple logo symbol


How to type the Apple logo symbol

Here’s how to enter the Apple logo with your devices.

Mac

To type the Apple symbol on your Mac, use the following keystroke combo:
Option (⌥)-Shift (⇧)-K
The shortcut works with the standard US English keyboard layout.
To visualize the Apple symbol’s placement on your Mac keyboard, choose the option Show Keyboard Viewer from the Input Source popover in macOS’s menu bar.
Alternatively, venture into System Preferences → Keyboard → Input Sources.
The Apple logo symbol shortcut shown in macOS's Keyboard Viewer feature
This is the keyboard shortcut that produces the Apple logo symbol
This lets you visualize key assignments for special symbols. To reveal additional hidden characters, press a modifier key like Control (⌃) or Command (⌘).
International users who rely on world keyboards that feature keyboard layouts that are different from the standard US QWERTY keyboard can add the US English layout via the Keyboard preference pane, then switch to it before entering the Apple logo symbol.
As a more elegant solution, create a custom text replacement as outlined further below.

iPhone and iPad

The Option (⌥)-Shift (⇧)-K Mac keyboard shortcut has no alternative on iOS.
There’s no Keyboard Viewer on iPhone, but iOS include a dedicated feature to make entering phrases and special symbols easier, called Text Replacements. Also found on macOS, this auto-replaces a word or a phrase with custom text, like replacing (c) with the copyright symbol.
You can leverage this feature to type the Apple logo on iOS, here’s how:
1) Open Settings on your iPhone or iPad.
2) Tap General.
3) Tap Keyboard.
4) Tap Text Replacement.
5) Hit “+“ in the top-right corner to create a new text replacement.
6) Copy  from this post with your iOS device, then tap and hold next to Phrase and select Paste from the bubble menu to insert the Apple logo symbol.
The Text Replacements feature lets you assign the Apple logo symbol to a custom phrase
7) Tap next to Shortcut and create a custom text snippet to be replaced with the Apple logo. I use the shortcut “appl,” but you may choose a different shortcut that better suits your needs. To avoid triggering it by accident, come up with some unique letter combo that’s not part of any common word or phrase.
8) Tap Save in the top-right corner to finish making changes.
The newly created shortcut will automatically expand into the Apple logo symbol as you type.
TUTORIAL: How to create and use Text Replacements on iPhone and iPad
That’s right, now you can enter the Apple logo with your iOS device or Mac in your emails, texts, documents, notes and more—just hit the Space bar after typing the “aapl” shortcut to have it replaced with the Apple logo character.
This is a great feature!
The key benefit of this method is synchronization: your text replacements are kept in perfect sync across iOS and macOS via iCloud, letting you enter the Apple logo across iPhones, iPads and Macs using the same text shortcut.
If you pair a wireless Bluetooth keyboard with your iPhone and iPad, you can also enter the Apple logo symbol by pressing the same Option (⌥)-Shift (⇧)-K keystroke like on Mac.Jihosoft iPhone Backup Extractor Extract and recover all types of data from iPhone backup files, such as camera roll photos, videos, SMS, contacts, reminders, WhatsApp, and etc.
Gihosoft Free iPhone Data Recovery is a professional iPhone Data Recovery software to get back all your lost text message, photo, video, call history, note, contact and more from iPhone/iPad/iPod Touch.